

How To Change Author On Blog Post Squarespace
This post may contain affiliate links. We may receive a commission for purchases made through these links (at no cost to you, of course! 🙂)
A while ago now, I had the pleasure of designing a blog website for awesome ladies over at The Female Hustlers, a group of women who are inspiring other women, in business and in life.
Their group of Blog authors was around the 25+ mark, and of course, they wanted each author to have their own signature to place at the end of their blog posts. Squarespace doesn't have the built-in ability to have blog post author signatures at the end of posts, so I had to figure out a way to add a signature to each Blog post that had the author's photo, name, information, and backlinks.
You could add these signatures manually to each Blog post, but you would have to do it every single time, and more importantly, what if their information changed? What if we had to make an edit to the information in a signature? If we had put all of these signatures in manually, we would have had to go back to every single Blog post that author wrote and update the signatures one by one. That sounded like time-wasting nightmare to me. When there's 100's of Blog posts to sift through, this just totally isn't an option!
Luckily, I love a good Squarespace-hack challenge, and I figured out a technique where you can update the signature in one place, and it will update all of them (yaaas!)
The key to this method is using a Blog page combined with a Summary Block — let's dive in!
Step 1. Create the "author signatures" Blog page
-
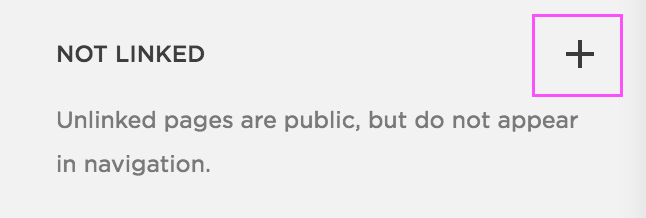
Click on Pages, scroll down to your Not Linked section.
-
Create a new Blog page in the Not Linked section by clicking the + icon and call this Authors or Signatures (or whatever works for you):

Step 2: Add a blog post
-
We're going to create a new Blog post for each author signature we want. So, add a new Blog post by clicking the + icon inside the blog page.

Step 3: Add the author signature information
-
What you will want to do now is to add the information you want to display in your signature.
-
Please note that depending on which version of Squarespace you're using, the blog panel may look a bit different than my screenshots. You can still follow the exact instructions, though.
-
Add the Title of the signature here:

-
And under "Options", you can add an image for the signature under "Thumbnail image", and any extra text that you want under "Excerpt"

-
In the excerpt, you can format the text as you like with different headers. You can also add links by using the link button:

Step 4: Add the author tag
This step is important. In the blog panel, locate where you can add tags and categories. Add add the author's name as a new tag:

Step 5: Create the author bio page
Because your signature will be clickable (this is automatic and can't be easily removed) you'll should copy what you wrote in the Excerpt and paste it in the main body of text of your blog post. Or, you could write even more here about the author.
This body section will not show in your signature, but, if someone was to click on the signature it will open this Blog page, and this body of text will be available to read. So you can add whatever you like about the author here, but just don't leave it blank.
Step 6: Add the author signature to your blog post
We're basically done, we just need to add the Summary Block/signature to the end of our Blog post!
-
At the end of your Blog post, add a Summary Block - List:

-
Then, select your Author/Signature Blog from the list:

-
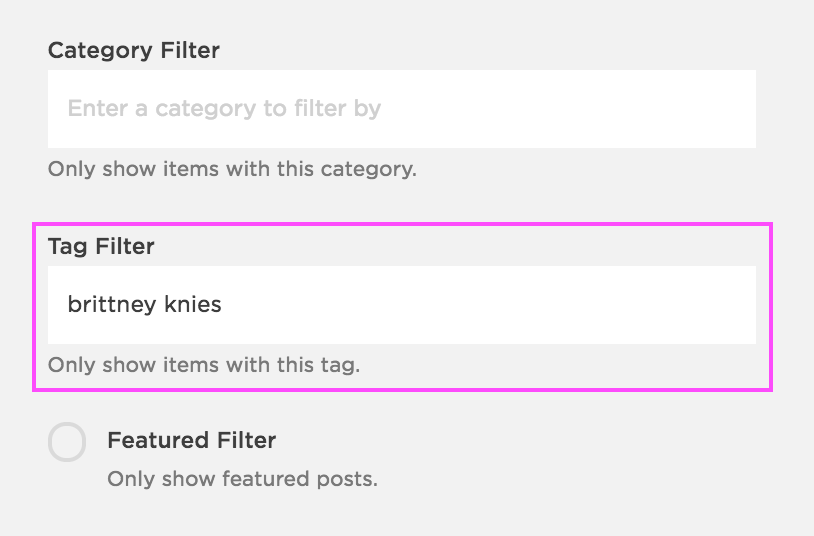
Under Display, add these settings. Remember under "Tag Filter" to use the author name that you added as a tag in Step 4.

-
Under Layout, adjust all of these settings until you're happy with how it looks.

And there you have it! Once you have all of the authors set up in your Blog, it's as easy as adding a Summary Block and a Tag Filter, and you have your very own signature.
Here's what the complete signature looks like:

And when I click on the image of the Author, it takes me to this Blog post page (Step 5, where we added extra information into the Blog main body of text)

How easy and awesome is that? Using this method means that you mean easily add tons of authors, so this is especially great if you have lots of authors or are adding new ones frequently.
To make it even easier, you could add the Summary Block to your Blog Post Template so you don't have to add the Summary Block each time!
Liked this post? Pin it to Pinterest! 👇

How To Change Author On Blog Post Squarespace
Source: https://www.bigcatcreative.com/blog/how-to-create-a-blog-signature-in-squarespace
Posted by: milesupor1961.blogspot.com
0 Response to "How To Change Author On Blog Post Squarespace"
Post a Comment